Introduction
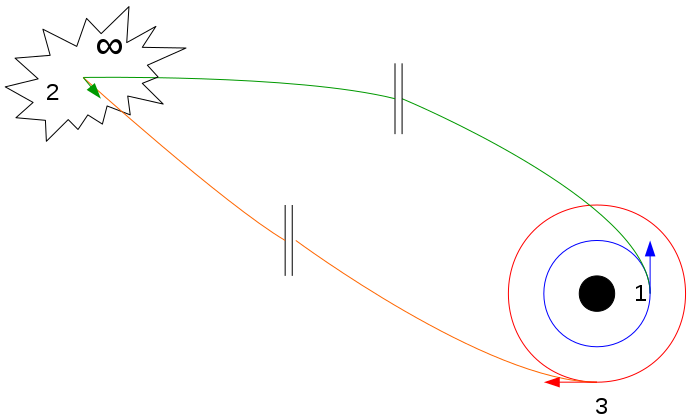
So finally its time for you to send your spacecraft from Earth to Mars, but guess what, your ancestors used most of it. Now you are limited to about a hundred tons of fuel, roughly 1/55th of the volume of the olympic pool size (bit unrelated). But they did leave you with two classic tricks. They are the Hohmann transfer theory and the bi-elliptic transfer theory. The major difference between the two is that Hohmann’s process is a two burn, short hopping process while the bi-elliptic transfer is a three burn, long detour kind of process. But both gets you from a low circular orbit (blue) to a high circular orbit (red) 1 by AndrewBuck - Own work, CC BY-SA 4.0, Link

The Hohmann path is an ellipse tangent to the start and end orbits; it uses two engine burns (one to push out, one to circularize). The bi‑elliptic path adds a third burn: first you boost to a very high, elongated ellipse, then you push again to change periapsis, and finally circularize. Bi‑elliptic takes longer (the ship goes way out and comes back) but in some cases it saves fuel (Δv). Which is better depends on how far apart the orbits are and how high you send the intermediate apoapsis. This article compares the two maneuvers, derives their Δv costs, and shows when each is optimal23.
Hohmann transfer
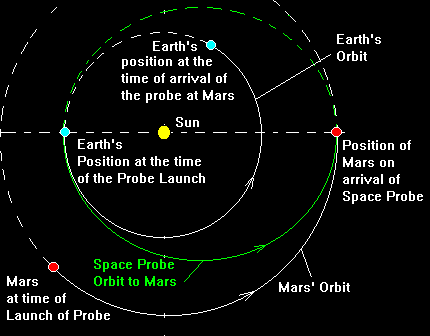
Boost at perigee to enter an ellipse reaching the new orbit’s altitude, coast to apoapsis, then burn to circularize. It is always fuel-efficient for small to moderate changes in orbit. For example, to go from Earth (1 AU) to Mars (1.524 AU) around the Sun, a Hohmann transfer takes about 9 months and costs roughly 5.6 km/s of Δv (two burns of ≈2.95 and 2.65 km/s)4. (Launch windows occur about every 26 months when Earth and Mars align.) The formula for the total Hohmann Δv can be written with vis-viva speeds:
\( \Delta v_H = \overbrace{ \left| \sqrt{\frac{\mu}{r_1}} \left( \sqrt{\frac{2 r_2}{r_1 + r_2}} - 1 \right) \right| }^{\Delta v_1} + \overbrace{ \left| \sqrt{\frac{\mu}{r_2}} \left( 1 - \sqrt{\frac{2 r_1}{r_2 + r_1}} \right) \right| }^{\Delta v_2} \)
where $r_1$ and $r_2$ are the initial and target orbit radii and $\mu$ is the central body’s gravity parameter. Basically, you speed up to enter the transfer ellipse (raising apoapsis), and then speed up or slow down to match the new circular orbit5. 64

Bi‑elliptic transfer
Taking the long way home ahh. First burn into a very elongated ellipse (green) that flies out well beyond the target orbit. At this far point you burn again to raise the low periapsis to the target radius, and finally burn a third time to circularize in the final orbit (red). This method uses one extra impulse but can reduce Δv if $r_2$ is much larger than $r_1$ 3. The Δv adds up like: $$ \begin{aligned} \Delta v_1 &= \Bigl|\sqrt{\tfrac{2\mu}{r_1}-\tfrac{\mu}{a_1}} - \sqrt{\tfrac{\mu}{r_1}}\Bigr|,\ \Delta v_2 &= \Bigl|\sqrt{\tfrac{2\mu}{r_b}-\tfrac{\mu}{a_2}} - \sqrt{\tfrac{2\mu}{r_b}-\tfrac{\mu}{a_1}}\Bigr|,\ \Delta v_3 &= \Bigl|\sqrt{\tfrac{2\mu}{r_2}- \tfrac{\mu}{a_2}} - \sqrt{\tfrac{\mu}{r_2}}\Bigr|. \end{aligned} $$ Here $a_1=(r_1+r_b)/2$ and $a_2=(r_2+r_b)/2$ are the semi-major axes of the first and second ellipse, and $r_b$ is the chosen far apoapsis. (If one chooses $r_b = r_2$, the bi‑elliptic transfer becomes the standard Hohmann, and $ \Delta v_3=0$ 7.) In practice you pick a large $r_b$ to minimize $\Delta v_3$ at the expense of extra time. Please switch the themes for the diagram to be visible better.

When Each Wins
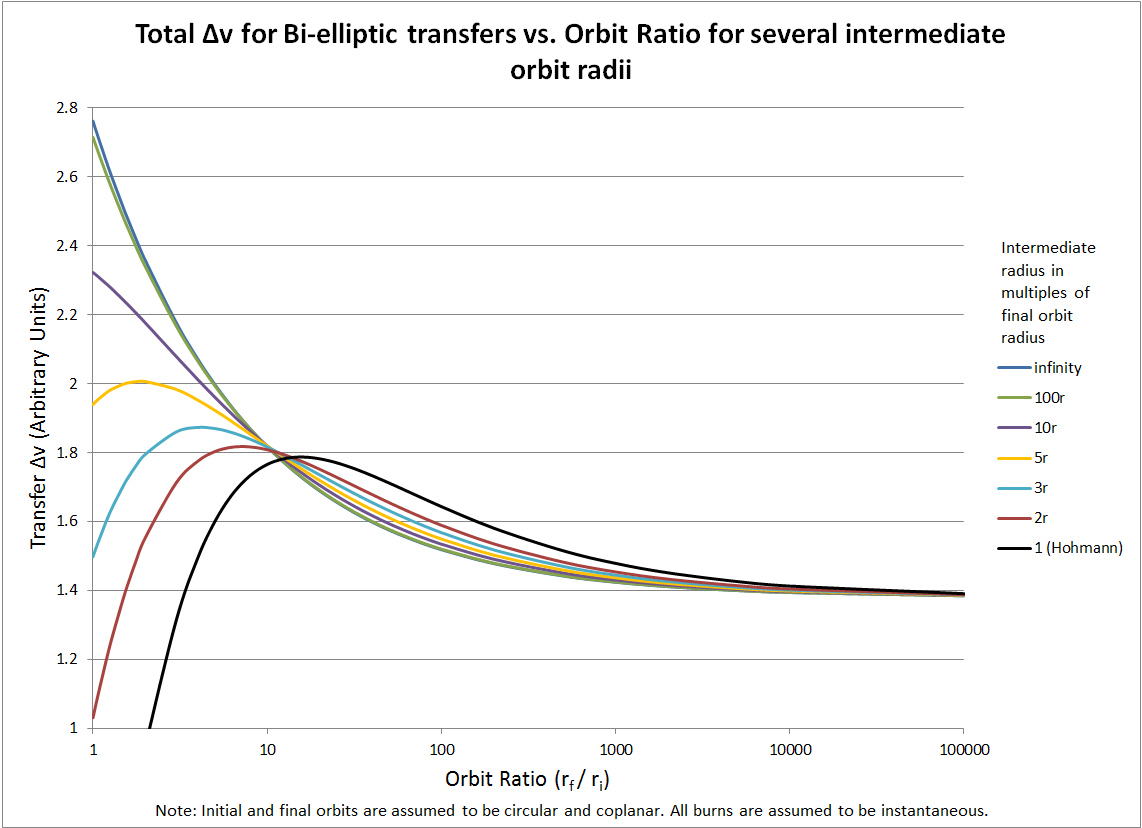
If the final orbit is only moderately larger than the start, Hohmann wins. In fact, it can be shown that for a radius ratio $R = r_2/r_1$ less than ≈11.94, the Hohmann two-burn always uses less Δv 38. For very large ratios, the bi‑elliptic detour pays off: if $R$ exceeds about 15.5 (or in detail 15.58 8 ), any bi‑elliptic with $r_b > r_2$ will beat Hohmann on Δv 98. Between ~11.94 and 15.58 it depends on $r_b$: one must search the sweet spot where adding that extra ellipse just outweighs the cost of an extra burn. In summary, for $R\gtrsim12$ consider bi‑elliptic; for $R\ll12$ stick with Hohmann 38 . Note this matches intuition: if your target orbit is many times farther out (like a Moon or Lagrange point transfer), the long race can be “cheaper” fuel-wise. Otherwise, Hohmann’s quick two-burn orbit is best. 10

How Δv is found
In any circular orbit of radius $r$, orbital speed is $v=\sqrt{\mu/r}$. The vis‑viva equation $v^2 = \mu!\bigl(2/r - 1/a\bigr)$ gives speed at any point in an ellipse of semi-major axis $a$. A burn changes your speed by $\Delta v = |v_{\rm new} - v_{\rm old}|$. For example, the first burn in a Hohmann transfer changes speed from the original circular speed $\sqrt{\mu/r_1}$ to the ellipse’s periapsis speed $\sqrt{2\mu/r_1 - \mu/a_t}$ (with $a_t=(r_1+r_2)/2$). The second burn at apoapsis likewise changes from the ellipse’s speed to the circular speed at $r_2$. Summing these differences gives the formulas above. One can plug in numbers (using $\mu_{\oplus}$ or $ \mu_{\odot}$ as needed) to compute exact Δv for specific cases.
Toy Example
Suppose we compare Earth’s orbit ($r_1=1\,$AU) to Mars’ ($r_2\approx1.524\,$AU). Here $R\approx1.524$, far below 12. A Hohmann transfer (two burns) costs about $5.6$ km/s total (roughly 2.95 km/s + 2.65 km/s) 11. A bi‑elliptic detour (e.g. flying out to some very large $r_b$) would actually cost more Δv in this case, so it’s not used. In other words, for Earth–Mars the quick two‑burn Hohmann “short hop” is optimal.

Finishing Up
To keep things easy, think of Δv like fuel. Hohmann is the minimal-fuel two‑burn strategy for moderate moves. Bi‑elliptic adds a third burn and a big detour: it often takes more time but can save fuel if the target orbit is very far out 29 . The rule of thumb is that if your final orbit radius is more than ~12 times the initial, check a bi‑elliptic solution 38. Otherwise, stick with Hohmann. In either case, you can plug into the vis‑viva and Δv formulas above to compute the fuel cost.
